How to change display name in “Name” column on the Mozilla Thunderbird Address Book

I came across this very question from someone who recently asked me a free mail client recommendation.

This is possible however not an easy one to find, even with an internet search it took me sometimes to find the answer. This has triggered this short post for reference, hopefully it will help some of you as well. The demo contact, before and after pictures are further down. Let’s go!

  1. Click on the “sandwich menu” button, and then “Preferences
  2. On the “Preferences” screen, search “Config Editor” using the search bar
  3. Click the button “Config Editor…” that will be displayed in the search result
  4. In the field “Search preference name“, type “mail.addr_book.lastnamefirst
  5. Click the “pen” icon at the end of the line in the result
  6. Change the value to one of the value below depending on what you to see in the Address Book “Name” column:
    • 0 : (default value) to display “Display Name” value from the contact data in the address book.
    • 1 : to display “Last Name, First Name” values from the contact data in the address book.
    • 2 : to display “First Name, Last Name” values from the contact data in the address book.
  7. Click the “Save” button to save this change and the result should be immediately visible.
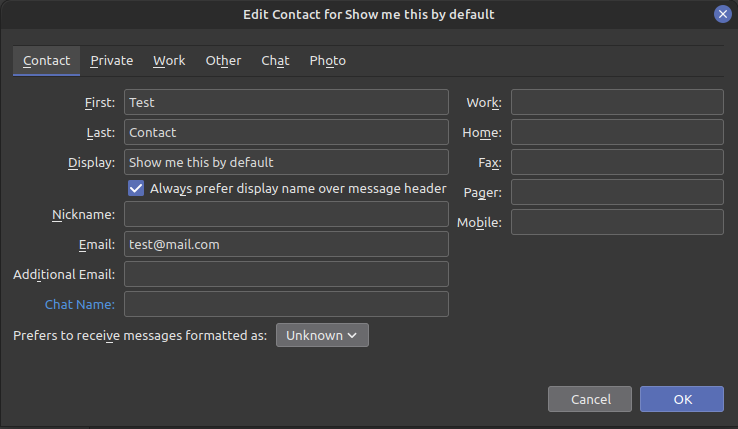
This is the demo contact card.
How the contact appears before changing the preference setting.
How the contact appears after changing the preference setting.

Citrix Workspace App on Linux (Working from Home)

For those lucky people who didn’t lost their job and are now working from home following the Covid-19/Coronavirus outbreak a lot of us had to start working from home. A lot of large company are using Citrix XenApp as virtual environments for their employees. That is my case and I know we have let many of our employees down when they are telling us they are using a Linux client at home. My job is to provide support to all our employees but as we are not allowed to touch personal machines we simply advise them to install Citrix Workspace App and use it to connect remotely. Simple and easy, but those very few Linux users found themselves stuck quickly if they are not tech enthusiasts, and simply run a Linux system for their ageing machine or whatever reasons they choose to go that way.

So let’s get started with Citrix Workspace App installation, configuration and connection. These steps have been repeated by myself on Linux Mint (but this should be applicable to any Debian based distribution)

Browse to Citrix.com, go to download then choose Citrix Workspace App for Linux page.

I will assume you already have Linux Mint setup and ready to use. Download Full Package (Self-Service Support) .DEB, my machine runs with 64 bits system so I downloaded the x86_64 version. If you are running 32 bits system, download the x86 version.

When you click “Download” it will ask if you want to open (after the download completed) with GDebi Package Installer, that the default option, click “OK“.

The Package Manager will open, click “Install Package” and type in your password to start installing.

When the installation is complete, open the desktop menu, search Citrix and open Citrix Workspace. You will be prompted to accept the End User License Agreement (EULA). Once those are accepted you will be asked for the details provided by your IT Department.

If you receive an error stating your account cannot be added because a secured connection (SSL) cannot be established, we need to run a couple commands below to allow Workspace App to use certificates RootCA already trusted by the web browser. Close Citrix Workspace App then open a terminal and type in the following commands.

sudo ln -s /usr/share/ca-certificates/mozilla/* /opt/Citrix/ICAClient/keystore/cacerts
sudo /opt/Citrix/ICAClient/util/ctx_rehash

The above commands are badly explained in Citrix KBA CTX231524

Open Citrix Workspace App again, provide the information from your IT department to login remotely and connect.

If you have keyboard mapping issues, when connecting to your remote workstation then you need to change some Citrix Workspace App settings, the problem the GUI doesn’t allow to perform these changes. Some information can be found on Citrix blog based on this we will edit “wfclient.ini

nano ~/.ICAClient/wfclient.ini

In the section “WFClient” search for “KeyboardLayout = (User Profile)“, it should be the 2nd line of the section. Replace it with the language of your choice as per Citrix documentation. Scroll down in the document until “Appendix A. Keyboard Name in File” and look for the name in the column “Keyboard Name in Configure File” get the name from this column and replace “(User Profile)” on the line by the name of the language you wish to use. In the example below it is “British”

[WFClient]
Version = 2
KeyboardLayout = British
; Rest of the default configuration below...

At this stage everything should be working normally… but I noticed on my Linux Mint greeter (login) screen there is a new account visible “citrixlog” that showed up. Let’s correct this as well as this account is an application user and we will never use it directly. We need to hide it from the greeter.

Let’s create a new file to hide the account from the greeter

sudo nano /var/lib/AccountsService/users/citrixlog

And add the followind to this new file:

[User]
SystemAccount=true

Then restart the service “AccountsService

sudo systemctl restart accounts-daemon.service

Now this account isn’t visible on the greeter screen.
How To: Setup SUDO and add an existing user to SUDOERS

This steps are performed on fresh Debian 10 installation, they can be followed on any Debian based distributions.

Login with an existing account, here it will be the user ‘arnaud‘, once logged in connect as root:

su

Type in the root password then, we will start by updating our repository sources and install sudo package:

apt-get update
apt-get install sudo

While we are connected as root, we will had one of our existing users to sudo group to grant use of sudo special command. In this example the existing user is ‘arnaud’.

/sbin/usermod -aG sudo arnaud

This command will not return anything if both the group and the username exists.

We can now exit from our root connection.

exit

The user ‘arnaud‘ is now member for the ‘sudo‘ group but we must logoff from that account and login back for this last change to apply.

logout

We can login back immediately and check that we have been granted ‘sudo’ access.

groups

This should display the list of groups the account is member of, including ‘sudo’ group.

Additional step, only if you can access your server locally (even if you need to connect a screen and keyboard to it later): Disable SSH root access explicitly by editing the file “/etc/ssh/sshd_config

sudo nano /etc/ssh/sshd_config

Find the line “#PermitRootLogin yes“, remove the symbol “#” to un-comment the line and replace the final “yes” by “no“. The line should be now: “PermitRootLogin no

Then restart SSH service to apply the new configuration.

sudo service sshd restart

Now what about the existing ‘root’ user ? Where a lot of people recommend to disable it completely or other recommend to lock it. I will suggest you to simply change the password for a really strong password. Strong enough to be annoying to type to reduce the like of using it just because you can. Force yourself and any other users to prefix their commands with ‘sudo’ when superuser permissions are required. Why ? Because one day, something, for some reasons, will go bad and that day you will realise that only the root account can fix the problem and if you are impaired of the direct root access then you will beat yourself up for disabling it. My root passwords are all 32 characters long mixed cases, digits, special characters. The only thing that prevents me to use them: complexity. I use a password manager to store them just for the day I will need them.

More resources on SUDO and its possibility will come soon.

Writing a Raspberry Pi image on SD card

Identifying the SD Card mounting point to write the Raspberry Pi system image. Start by opening a command line as Root, and type the command lsblk to get existing list of available drive(s).

The usage of this information can damage your current system. Please use care and make sure to follow recommendations, advice and also your own analysis before proceeding. I will not take responsibility for any damage you may cause to your system following these instructions.

arnaud@VBM-Testing: ~$ sudo su
[sudo] password for arnaud:
root@VBM-Testing:/home/arnaud# lsblk
NAME   MAJ:MIN  RM    SIZE   RO   TYPE   MOUNTPOINT
sda      8:0     0     60G    0   disk   
-sda1    8:1     0     60G    0   part   /
sr0     11:0     1   1024M    0   rom

Then connect the SD Card by plugging it into the SD Card reader and type the same command again, lsblk. We will now get the SD Card information by comparison.

root@VBM-Testing:/home/arnaud# lsblk
NAME   MAJ:MIN  RM    SIZE   RO   TYPE   MOUNTPOINT
sda      8:0     0     60G    0   disk   
-sda1    8:1     0     60G    0   part   /
sdb      8:16    1   15.1G    0   disk
-sdb1    8:17    1   15.1G    0   part   /media/arnaud/SD16GB
sr0     11:0     1   1024M    0   rom

Here we can see a new device in the list, name sdb, with 1 partition on it: sdb1. That is a SD Card as it is the only device we connected in between. We can also see the partition is mounted. We need to un-mount them with umount command.

root@VBM-Testing:/home/arnaud# umount /media/arnaud/SD16GB

Note 1: The SD card was already imaged with a Raspbian image, that I wasn’t using anymore, you may see only 1 partition on the SD Card that have the size of the entire SD Card.

Note 2: Raspbian project has been renamed “Raspberry Pi OS” but it is none the less the same thing. As running the command on a “Raspberry Pi OS” cat /etc/os-release provide the following results and Raspbian naming is still all around. Don’t get confused by that in the near future. It is also very possible that changes later as well.

cat /etc/os-release
PRETTY_NAME="Raspbian GNU/Linux 10 (buster)"
NAME="Raspbian GNU/Linux"
VERSION_ID="10"
VERSION="10 (buster)"
VERSION_CODENAME=buster
ID=raspbian
ID_LIKE=debian
HOME_URL="http://www.raspbian.org/"
SUPPORT_URL="http://www.raspbian.org/RaspbianForums"
BUG_REPORT_URL="http://www.raspbian.org/RaspbianBugs"

We need to extract it from the zip file we downloaded before we can write it to the SD card, for that we will use unzip command. The file will be extracted in the current folder with command below (eg. /home/arnaud/ in this example).

root@VBM-Testing:/home/arnaud# unzip Downloads/2019-04-08-raspbian-stretch-lite.zip

We can now write the Raspberry Pi image to the SD Card using the command dd. This command will copy 4MB bs=4M at the time, from the source image if=2019-04-08-raspbian-stretch-lite.img to the SD Card of=/dev/sd. It will done synchronously with conv=fsync (meaning it will finish to write on the SD Card before reading the next 4MB of the image source) and status=progress will also display progression of the entire process.

root@VBM-Testing:/home/arnaud# dd bs=4M if=2019-04-08-raspbian-stretch-lite.img of=/dev/sdb conv=fsync status=progress

Progression will look like this:

448790528 bytes (449 MB, 428 MiB) copied, 14 s, 31.1MB/s

Note 3: Soon I will add a new article with my preferred 1st steps after getting the SD Card ready, those are definitely options but as mentioned my preferred steps before booting the OS for the 1st time. That article will be linked about here at the end of this article (just be patient for that one if you land here before I write it).

Once copy is completed it will return to regular prompt. The SD Card may mount automatically again, dismount it in this case, and remove it from the computer. We are now ready to boot from it using the Raspberry Pi.